Answer the question
In order to leave comments, you need to log in
How to make such a "grid" for letters?
Answer the question
In order to leave comments, you need to log in
One of the options.
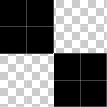
First, create a 4x4 pixel file. Draw two black squares in any convenient way. Create a pattern from this image (Edit> Define Pattern).
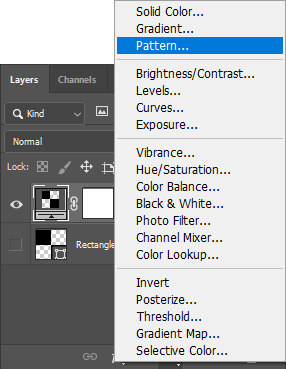
Hide the existing layers here and add a new one filled with a new pattern. This is necessary for more convenient subsequent editing.
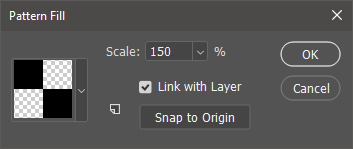
Further options are possible. If you want, you can increase the size of the canvas to the size of the caption image. And you can only under the percentage increase of the pattern. It is a must to increase it. Then the boundaries will be less clear. For my example, a scale of 150% has become good. Accordingly, the size of the canvas must be increased by 50%, that is, up to 6x6 pixels, in order to get a repeating pattern.
The disadvantage of the second option is that for each scale of the pattern, you will have to change the size of the canvas. The first option also has a small minus - there you need to keep track of the size of the final image. Simply put, also resize the canvas as needed. But already for each new picture, if they, of course, have different sizes.
Save the file in PSD format. It is not necessary to close it, so that for the time being there is an operational opportunity to edit it.
Create a main file with an inscription. Apply it in the chosen font, size and color. Make this layer a smart object.
Apply Filter > Distort > Displace to it. The bias is selected empirically. I can't tell you the exact values for your inscription in advance. I was satisfied with the values 3 and 1. In any case, the horizontal offset should be greater than the vertical one. Although no one forbids you to create your own effect. I'm up to the example.
If you filled the canvas with a pattern to fit this image, then select the Stretch to Fit option. If followed by the second option - Tile.
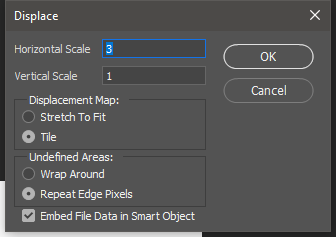
Specify the previously saved file with the pattern as the displacement map.
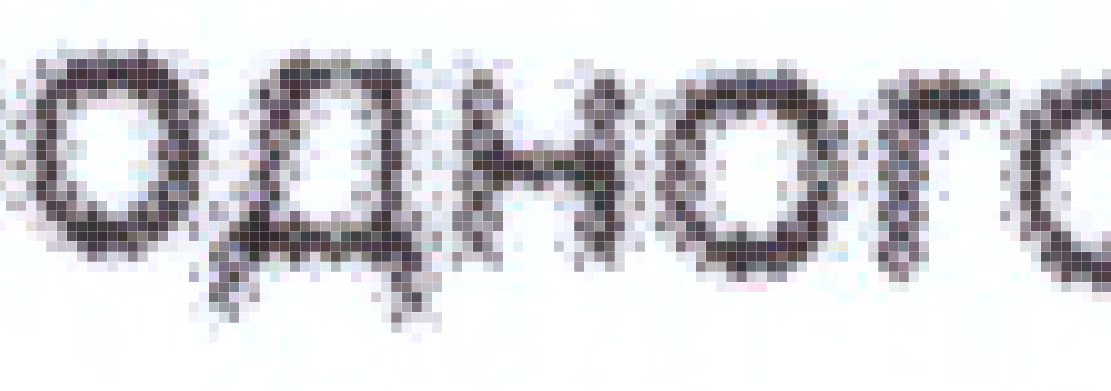
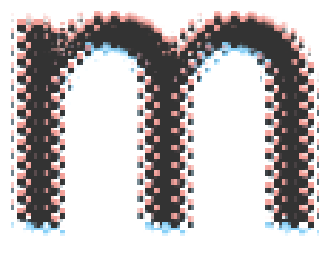
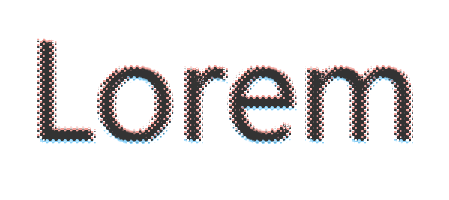
Done:

Thanks to the smart object, you always have the opportunity to edit all the parameters of the caption and filter.
To enhance the effect, you can add two more duplicate layers, which will enhance the glitch effect. As a rule, they have light red and blue hues. You can do this both inside the smart object and just with its duplicates. But the first way is better, because otherwise, when changing the displacement map, you will have to change it for three layers instead of one. On the other hand, there you have to change the text on three layers manually. But it seems to me that this is easier than specifying the displacement map three times.
If you really want to, then you can make a smart object from the inscription. Create their color duplicates. Turn all these three layers into a new smart object, to which we already apply a displacement map. In this case, the number of manual changes during editing is reduced by a factor of three for any of the cases.

Didn't find what you were looking for?
Ask your questionAsk a Question
731 491 924 answers to any question