Answer the question
In order to leave comments, you need to log in
How to fix a key on a Macbook that didn't have anything bad but doesn't work well?

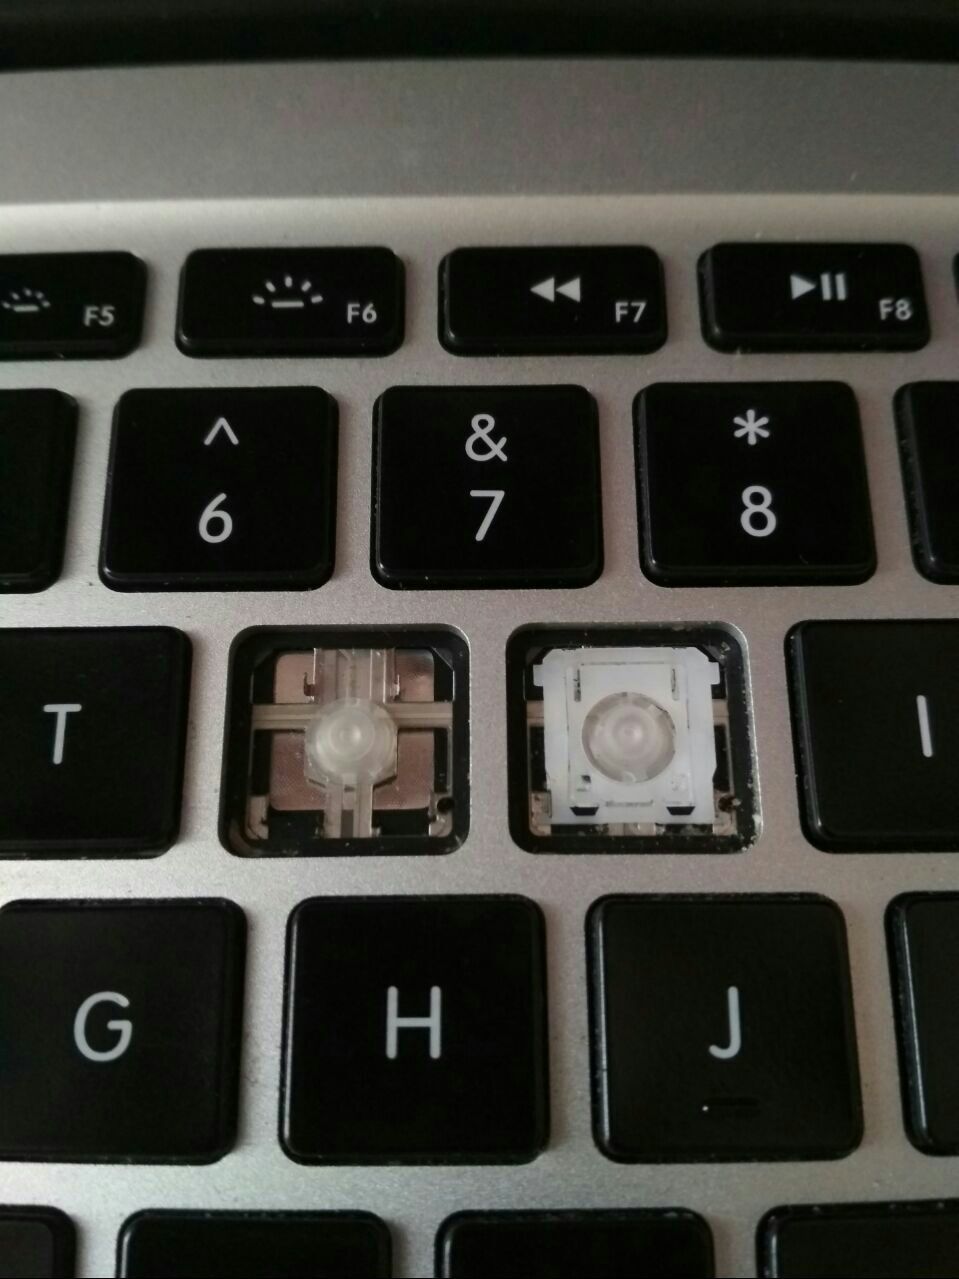
One key stopped responding to pressing. Reacts only if you press harder, it works several times. Didn't flood the keyboard.
I dismantled a bad key, it is on the left, I dismantled the neighboring good one, it is on the right. The result is the same, even without the button design, the key does not work well. On all the videos on the Internet, they clean the removable structure, I'm fine with it.
Where is it wrong here? Can you disassemble further? I don’t want to touch it without the advice of experts, but I need to fix it.
upd. As I understand it, it's a rubber conductive membrane. What can be done with it? How to move or reinstall?
Answer the question
In order to leave comments, you need to log in
Vryatle it will be possible to fix it. It's not about the membrane, it's not conductive, it just presses on the film, it's used as a spring. The design of the keyboard consists of two films with drawn tracks and contacts for each button, between these two films there is a third insulating one. In the center of the buttons, in this insulating film, there are round holes, the button closes when you press the two extreme films. Most likely, some water got on the non-working button, or somehow between the films, a speck of dust got between the contacts under the non-working button.
Sometimes in some cases, you can still fix such a malfunction. But this is comparable to a surgical operation =) The gum can be peeled off, then you need to carefully examine the tracks and the contact under it. It can be immediately seen that a darkened contact or track. The top film can be cut in the place where the track does not pass through it (you can see where they pass, you can cut it in 4 places, if you cut the film with the track, then another 5 keys will fail and it will be impossible to fix it) gently with a scalpel, only one of them without damaging the bottom films. To cut like this, you need to pick up the top film with a needle and lift it slightly. The film is glued along the edges, but the glue is weak. As a rule, you can cut it in two places and then you can lift the film (bend upwards, but not much so that there is no break). As a result, we get access to the contacts and tracks on the top film. They can already be cleaned, wiped and even drawn (restored if the track is oxidized) with a conductive marker. If the damage is on the bottom film, then we cut the next central one, there are no more tracks there, and we will get access to the bottom one.
It happens that just the contacts on the film are acidified and therefore, when pressed, they do not close well. Then you can peel off the gum and lightly press, for example, with a screwdriver in the center, push it a little. The main thing is not to overdo it, otherwise it will be constantly closed.
P.S. If you try to do this, then you risk making it worse and you will have to change the CL. In general, this is all at your own peril and risk. If you are not confident in your abilities and there are no tools (sharp scalpel, tweezers, dental probe (curved needle), conductive marker or glue), then there is probably no point in even trying. But if the button does not work well for you, then either change the keyboard, or try to do what I wrote, or leave it as it is.
I had this problem too. The key was badly pressed, and sometimes a character was printed several times. Apparently
I cut the top film without affecting the tracks and lifted it up. Under the next film, next to the contact, I inserted a piece of paper to increase the space between the contacts. Helped.
Didn't find what you were looking for?
Ask your questionAsk a Question
731 491 924 answers to any question