Answer the question
In order to leave comments, you need to log in
Xamarin.Forms How to pass a button value to a function?
Hi all! I have the following task:
There are 4 buttons (3 buttons display values, and 4 button adds a value) when clicking on the button (containing the value) we have to change its color (when clicking again, return the color), and then clicking on the 4th button (add) we need to add +1 to the highlighted button.
Here is the code (most likely it is implemented incorrectly):
namespace Clicker
{
    // Learn more about making custom code visible in the Xamarin.Forms previewer
    // by visiting https://aka.ms/xamarinforms-previewer
    [DesignTimeVisible(false)]
    public partial class MainPage : ContentPage
    {
        public MainPage()
        {
            InitializeComponent();
        }


        private void Selected(object sender, System.EventArgs e)
        {
            Button button = (Button)sender;

            if(button.BackgroundColor == Color.Red) {
                button.BackgroundColor = Color.LightGray;
            }
           else
            {
                button.BackgroundColor = Color.Red;
            }

        }

        int count = 0;
        private void ButtonClick(object sender, System.EventArgs e){


            count++;
            Button buttonOne = (Button)sender;
            buttonOne.Text = Convert.ToString(count);

        }


    }
}
<?xml version="1.0" encoding="utf-8" ?>
<ContentPage
x:Class="Clicker.MainPage"
xmlns="http://xamarin.com/schemas/2014/forms"
xmlns:x="http://schemas.microsoft.com/winfx/2009/xaml"
xmlns:d="http://xamarin.com/schemas/2014/forms/design"
xmlns:mc="http://schemas.openxmlformats.org/markup-compatibility/2006"
mc:Ignorable="d">
<StackLayout>
<!-- Place new controls here -->
<Grid>
<Grid.ColumnDefinitions>
<ColumnDefinition Width="*" />
<ColumnDefinition Width="*" />
<ColumnDefinition Width="*" />
<ColumnDefinition Width="*" />
</Grid.ColumnDefinitions>
<Grid.RowDefinitions>
<RowDefinition Height="*" />
<RowDefinition Height="*" />
<RowDefinition Height="*" />
</Grid.RowDefinitions>
<Label Grid.Column="1" HorizontalTextAlignment="Center" VerticalTextAlignment="Center" FontSize="Large" Text="I"/>
<Label Grid.Column="2" HorizontalTextAlignment="Center" VerticalTextAlignment="Center" FontSize="Large" Text="II"/>
<Label Grid.Column="3" HorizontalTextAlignment="Center" VerticalTextAlignment="Center" FontSize="Large" Text="III"/>
<Label Grid.Row="1" HorizontalTextAlignment="Center" FontSize="Medium" Text="14"/>
<Button Grid.Row="1" Grid.Column="1" Clicked="Selected" Text="14.1" />
<Button Grid.Row="1" Grid.Column="2" Clicked="Selected" Text="14.2" />
<Button Grid.Row="1" Grid.Column="3" Clicked="Selected" Text="14.3" />
<Button Grid.Row="2" Grid.Column="3" Clicked="ButtonClick" Text="Add" />
</Grid>
</StackLayout>
</ContentPage>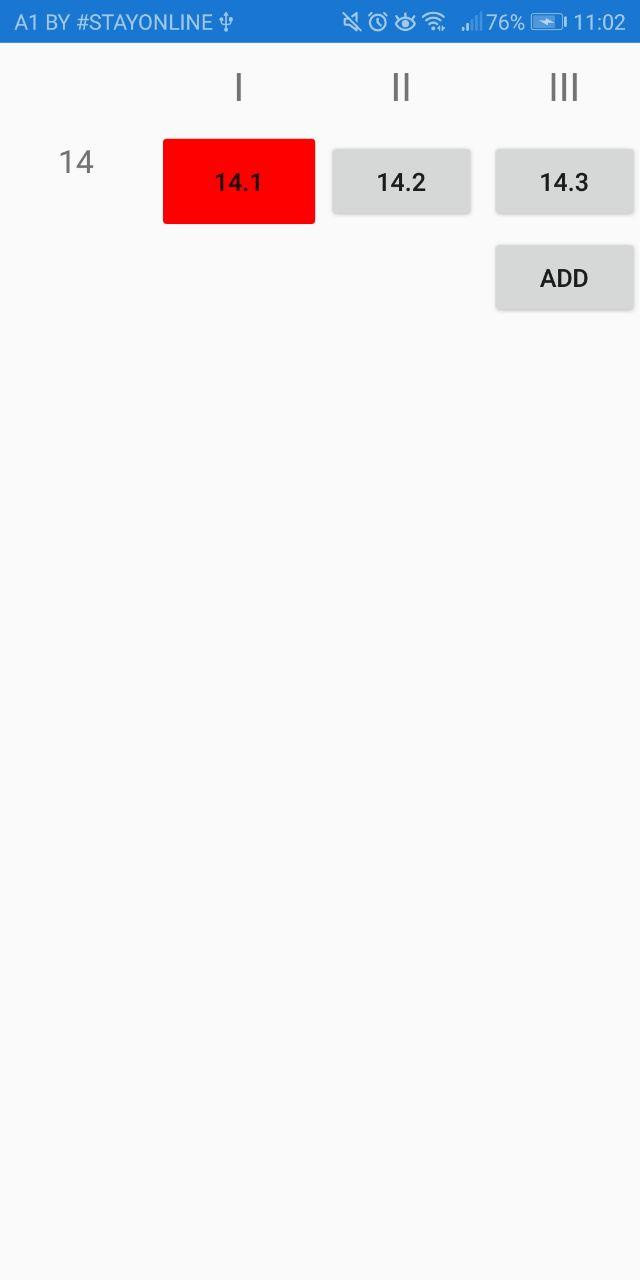
Answer the question
In order to leave comments, you need to log in
The best place to start is by reading the MVVM tutorials
Model-View-ViewModel Pattern The
key to this approach is the separation of the view ( View ) from the internal logic ( Model / VM ). In some very simple cases (such as demos), the Model and VM roles are merged into one.
Conceptually, what you described in your question can be defined as follows:
There is some object that contains information about the value being changed. The object is also characterized by two states: "pressed" (the button is colored red) and "released" (the button of the standard color). In terms of C#, it can be expressed as a class:
public class Item : ViewModelBase
{
    private int value;
    private bool isSelected;
    public int Value
    {
        get => value;
        private set => SetProperty(ref this.value, value);
    }
    public bool IsSelected
    {
        get => isSelected;
        set => SetProperty(ref isSelected, value);
    }

    public Item(int value, bool isSelected = false)
    {
        Value = value;
        IsSelected = isSelected;
    }

    public void IncrementSelected()
    {
        if (IsSelected)
        {
            Value++;
        }
    }
}public class MyContext
{
public int BaseValue { get; } = 14;
public Item Item1 { get; }
public Item Item2 { get; }
public Item Item3 { get; }
public MyContext()
{
Item1 = new Item(BaseValue, true);
Item2 = new Item(BaseValue);
Item3 = new Item(BaseValue);
IncrementSelectedCommand =
new DelegateCommand<object>(_ => IncrementSelected());
ClickCommand = new DelegateCommand<Item>(
o => SelectOrDeselect(o),
o => o is Item);
}
public ICommand IncrementSelectedCommand { get; }
public ICommand ClickCommand { get; }
public void IncrementSelected()
{
Item1.IncrementSelected();
Item2.IncrementSelected();
Item3.IncrementSelected();
}
public void SelectOrDeselect(Item item)
{
item.IsSelected = !item.IsSelected;
}
}<Style x:Key="selectableBtn" TargetType="Button">
<Style.Triggers>
<DataTrigger
Binding="{Binding IsSelected}"
TargetType="Button"
Value="True">
<Setter Property="BackgroundColor" Value="Red" />
</DataTrigger>
</Style.Triggers>
</Style><Grid>
<Grid.ColumnDefinitions>
<ColumnDefinition Width="*" />
<ColumnDefinition Width="*" />
<ColumnDefinition Width="*" />
<ColumnDefinition Width="*" />
</Grid.ColumnDefinitions>
<Grid.RowDefinitions>
<RowDefinition Height="*" />
<RowDefinition Height="*" />
<RowDefinition Height="*" />
</Grid.RowDefinitions>
<Label
Grid.Column="1"
FontSize="Large"
HorizontalTextAlignment="Center"
Text="I"
VerticalTextAlignment="Center" />
<Label
Grid.Column="2"
FontSize="Large"
HorizontalTextAlignment="Center"
Text="II"
VerticalTextAlignment="Center" />
<Label
Grid.Column="3"
FontSize="Large"
HorizontalTextAlignment="Center"
Text="III"
VerticalTextAlignment="Center" />
<Label
Grid.Row="1"
FontSize="Medium"
HorizontalTextAlignment="Center"
Text="{Binding BaseValue}" />
<Button
Grid.Row="1"
Grid.Column="1"
BindingContext="{Binding Item1}"
Command="{Binding BindingContext.ClickCommand, Source={RelativeSource Mode=FindAncestor, AncestorType={x:Type d:ContentPage}}}"
CommandParameter="{Binding .}"
Style="{StaticResource selectableBtn}"
Text="{Binding Value}" />
<Button
Grid.Row="1"
Grid.Column="2"
BindingContext="{Binding Item2}"
Command="{Binding BindingContext.ClickCommand, Source={RelativeSource Mode=FindAncestor, AncestorType={x:Type d:ContentPage}}}"
CommandParameter="{Binding .}"
Style="{StaticResource selectableBtn}"
Text="{Binding Value}" />
<Button
Grid.Row="1"
Grid.Column="3"
BindingContext="{Binding Item3}"
Command="{Binding BindingContext.ClickCommand, Source={RelativeSource Mode=FindAncestor, AncestorType={x:Type d:ContentPage}}}"
CommandParameter="{Binding .}"
Style="{StaticResource selectableBtn}"
Text="{Binding Value}" />
<Button
Grid.Row="2"
Grid.Column="3"
Command="{Binding IncrementSelectedCommand}"
Text="Add" />
</Grid>this.BindingContext = new MyContext();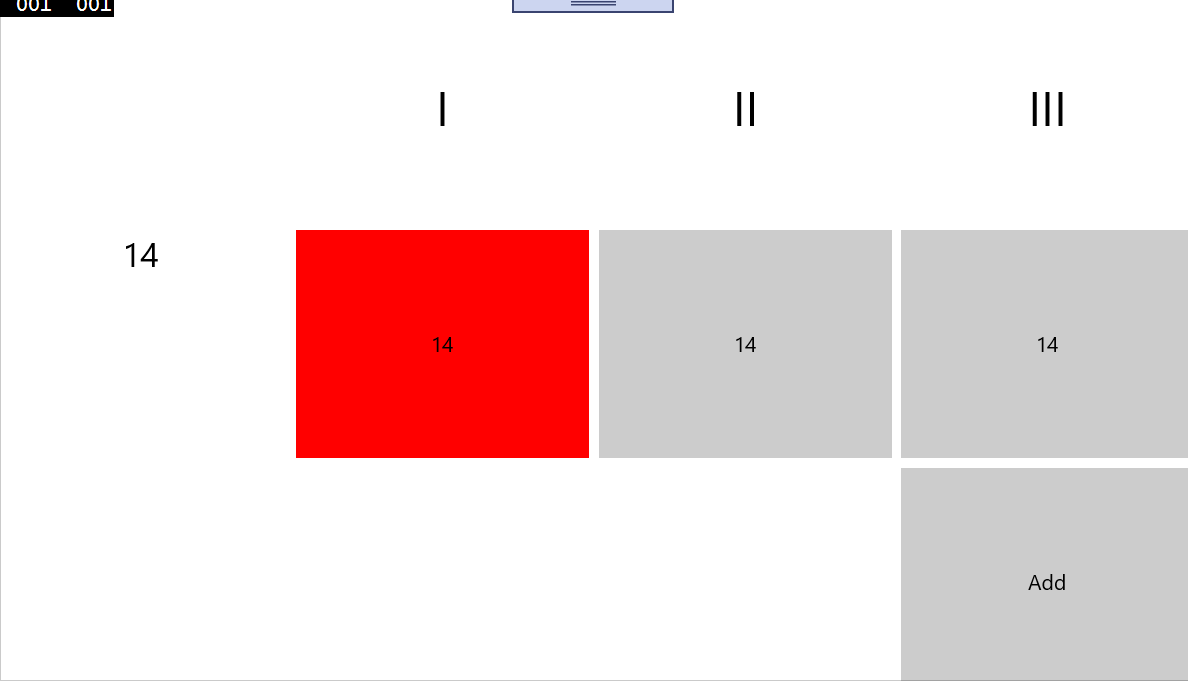
Didn't find what you were looking for?
Ask your questionAsk a Question
731 491 924 answers to any question